Right now, I may be the happiest person in the whole universe—yes, really! You read the title, so you know why—I self-published my first children’s book, which I wrote and illustrated all by myself. And I can tell you that I’m so, so proud!
I thought I would share my experience on my blog, because I learnt quite a lot of things doing that, so hopefully this will be useful to others, too!
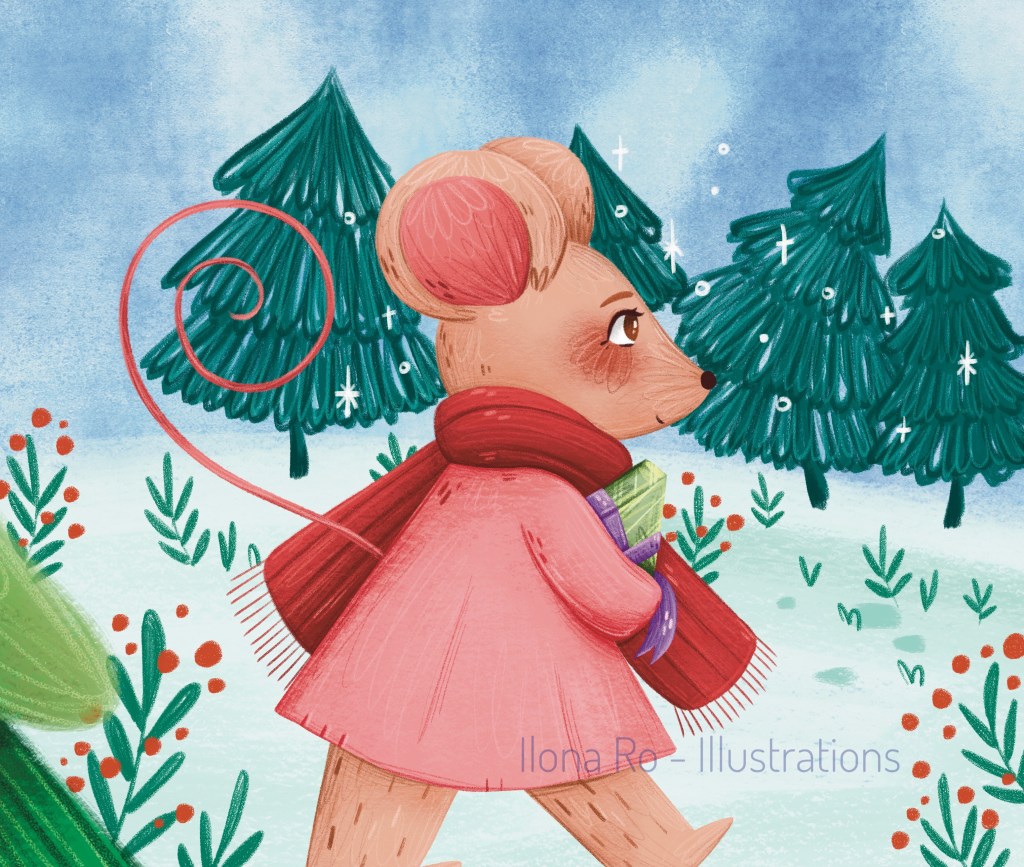
My story is called “Molly’s Christmas”, or, in French (because that’s the language I wrote it in in the first place), “Le Noël de Molly” (Amazon FR link here!), and it can be found on Amazon, or here for Amazon UK. It’s a 32-page story about a mouse who finds out that she received a present that is not for her, and who decides to bring it back to the mouse who should actually have received it.
I can’t really tell when the idea of this book came to me—maybe the ideas of some of the illustrations came first, actually. And then the rest followed.
As a children’s book illustrator, the first thing I did once I got my story idea was to create my storyboard, drawing a thumbnail for each illustration. I feel like this step is absolutely necessary—at least, it was for me.
I made all the thumbnails on the same page, so I could see what it would all look like in the end, and be sure that the illustrations were flowing all together. This step honestly didn’t take me a long time, because I had a precise idea in mind.
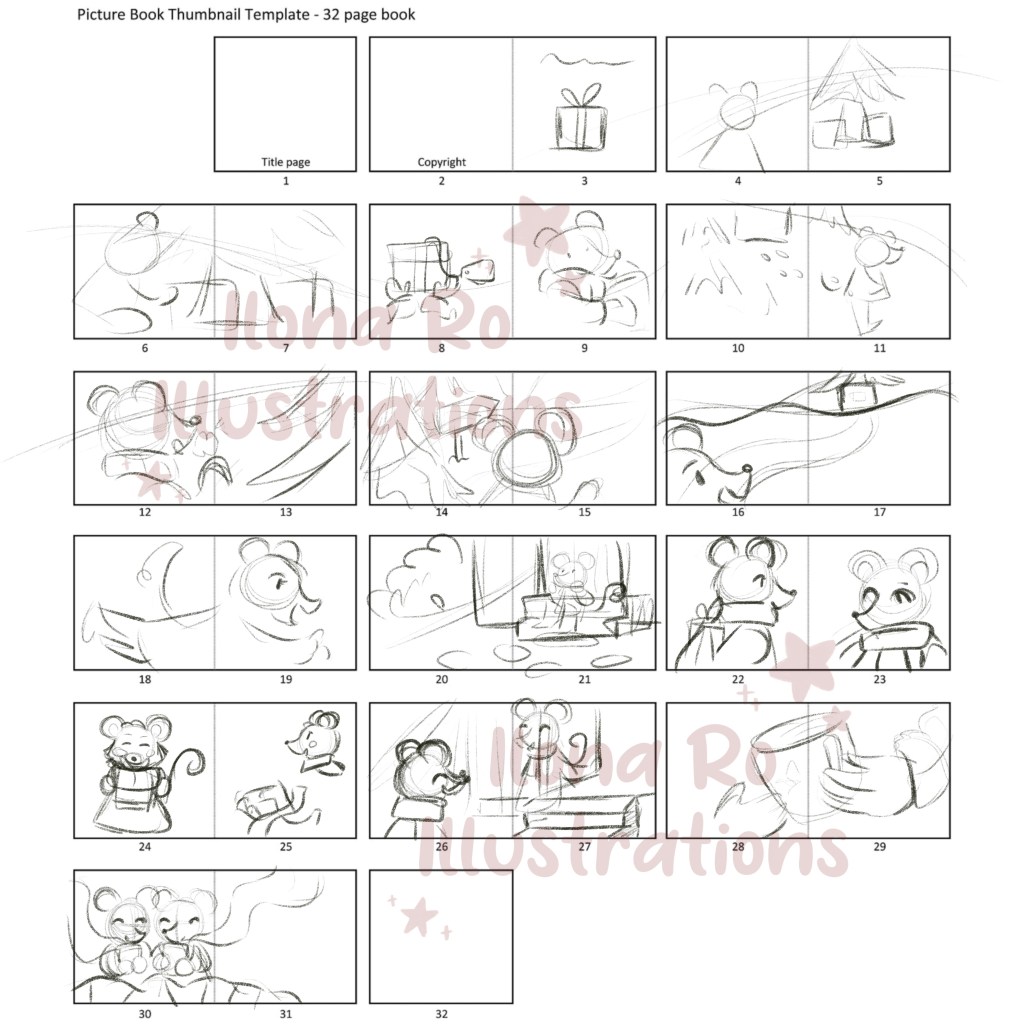
Above is my storyboard. It’s pretty rough, but that was the goal—I’ve got to admit that I’m not a big fan of this step, and I must confess that I even skip it when doing standalone illustrations (which doesn’t always turn out to be a good idea!).
I then went through the illustration process, doing my sketches one by one. I didn’t do a lot of changes from my thumbnails, which kinda proves me that I shouldn’t skip this step so often!
I already had the idea of my colour palette, so once my sketches were all cleaned up a little, I put my flat colours, then I added all the textures, shades, and lights, and, finally, the very last step—adding all the details, such as the flowers, plants, and snowflakes!
Then came the next step: the text.
It. Was. Not. Ready.
I knew what my story was about, but I wasn’t sure how to phrase it—I usually only tell stories through illustrations, I’d never worked on the text before!
So it took me a lot of time to get all my text ready, though I eventually did.
But having the text ready wasn’t enough to finish my book, because I now had to place it.
And I realised my next mistake: I hadn’t planned where I wanted my text to lay down on the illustrations. Now that I’m done with my book, I know that this is something I’m not going to forget the next time, because this would definitely have saved me a lot of time!
It took me quite a long time to figure out where to place my text, which colours to use, which font, which size. I’ve never done a book design before, and I’ve got to admit that I felt kinda lost here. I did all the layout using Canva—yes, for real.

I saved all my book layout as a PDF, eventually happy with how it had turned out!
I thought that everything would flow quite easily after that, but the next problem happened to arrive pretty quickly! This problem will probably seem really obvious for some, but for me it wasn’t. Here is what I was doing wrong:
I was trying to upload my children’s book to KDP with the spread illustrations—which, spoiler alert, doesn’t work; I had to split every page into two, so that I could actually upload each page separately.
But, once that was done… everything was good! I previewed my book on Amazon, showed what it looked like to some of my family members, and once my book was being reviewed, we celebrated!

Amazon tells you that you may have to wait 72 hours before your book can be added to the site, but I waited only 12 hours or so. Your self published book is not available at that very same time, though, but after just a few more hours, it was finally buyable!
(We celebrated again!)

Also, once my book was published on Amazon, I decided that I would create my Author Profile, so the next books I would write would appear there too, and all would be found more easily! Also, I’m still not completely sure how this profile works, but I think I should also be able to link it to other authors’ books that I illustrated. I still have to figure out how all of this works, though.
I’m now feeling incredibly proud of myself. Having my name on the cover of a book leaves me speechless! And having been able to illustrate and write my own children’s book is a dream come true!
I’d never have thought I’d be able to do this, for real, so this is also really confidence boosting! Now I can’t wait to go on the next projects!
Finally, I wanted to share some of the resources that I used to create my book. None of these are affiliate links, but I just thought that maybe some illustrators could be interested in these.
For the illustrations, I used the illustration templates created by Genevieve Design Studio. It’s a bundle containing Procreate brushes, but also .Procreate files that are formatted to create children’s book illustrations—they have the margins, bleed and trim size included, which has been incredibly helpful for me, and there are also different sizes that are all available on Amazon KDP.
Still for the illustrations, I did absolutely everything using the Procreate app for iPad. I used the Sketch Book Brushes by Lucy Fleming, as well as some brushes from the Gouache and Pastel Set by Marco Guadalupi, plus a few brushes from my own Illustrator’s Big Box.
I hope this blog post was helpful, and perhaps even encouraging—believe in yourself, and know that your dreams can come true!
I Hope to write on the blog soon!

Bravo Ilona, nous avons hâte de découvrir les aventures de Molly ! vos explications sont très intéressantes et attendons une suite avec impatience. A bientôt, Josette.
LikeLike